The POSCON FSX/P3D/MSFS 2020 Pilot Client is a client that connects the simulator to the Positive Control Network. Once you have logged in to the network the client will send information about your plane’s location, altitude, attitude, as well as a number of the plane’s parameters such as gear and flap deployment, engine RPM, state of various beacon and navigation lights, transponder mode and code, etc. The client also receives similar information from the network about aircraft that are within a 50 nautical mile range of your plane. This information is used to draw 3D models of the aircraft at their correct position and orientation.
To install the FSX/P3D/MSFS 2020 Pilot Client, you need to install the POSCON Launcher Client from POSCON HQ. Once done, navigate through the Launcher Client to Library and click on Download FSX/P3D/MSFS 2020 Pilot Client.
The Launcher Client will automatically download and install the Pilot Client on your computer. It will be located in:
C:\Users\[Your user]\AppData\Local\POSCON\P3D Pilot Client
The install location can be changed manually.
When properly installed, you can launch the Pilot Client from the Launcher. The button previously labeled “Download” will now be labeled Launch.
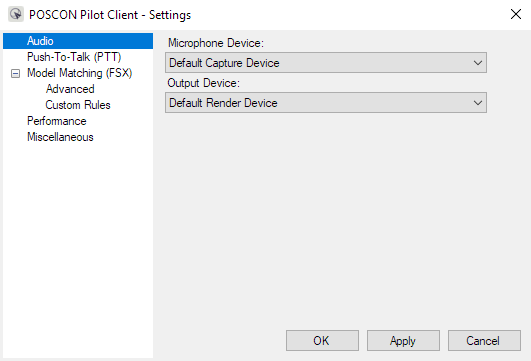
1. The Audio Tab
Here you can choose the audio device you wish to use for your microphone to talk to pilots and controllers, and the audio device to use as the output device for listening to voice transmissions from them. If the device is not yet plugged in, you will need to close the Settings window, plug in the device, and then re-open the Settings window.
2. The Push to Talk (PTT) Tab
In the Push to Talk (PTT) Assignment section, you can choose which keyboard key or joystick/yoke button you wish to use for PTT. Simply press the button labeled "Set new PTT Key or Button" and then press the keyboard key or joystick/yoke button that you want to use for PTT. The Pilot Client will detect the keystroke or button press and update the "Current PTT Assignment" accordingly.
3. The Model Matching Tab
Generally you only need to change the settings here if you want to change your default model. Please note - Depending upon the simulator you are flying this may display as 'Model Matching (MSFS)' or 'Model Matching (FSX)
3.1 The Advanced Tab
This section allows you to exclude models (either individually or as an entire folder) from use in model matching. You can also prioritize folders by rearranging them in this list using the "Move Up" and "Move Down" buttons. Folders higher in the list will be searched first for models to use to represent aircraft you encounter while flying online.
3.2 The Advanced Tab
Here you can add a custom model matching rule set by loading the file from your computer's hard drive. You might do this if you created your own file, or if you received a file from another user, or downloaded it from your VA's website. Custom rules files can be re-ordered to set the priority with which they will be used for model matching. Custom rule sets always take priority over the models found when the Pilot Client automatically scans your hard drive for installed models.
4. The Performance Tab
Here you can limit the number of aircraft that the Pilot Client will inject into the simulator. If you find your frame rate suffering when in a crowded area, reduce these numbers.
5. The Miscellaneous Tab
Here you can choose to have the Pilot Client automatically squawk Mode C when your aircraft becomes airborne. You should leave this checkbox unchecked if you are using an add-on aircraft that features SquawkBox transponder integration, since the Pilot Client will then be able to read the transponder mode directly from the aircraft's panel.
The checkbox labeled "Show incoming text messages in simulator" allows you to have any incoming radio messages or private messages displayed as text within the sim. This can be handy for users with a single monitor when the Pilot client is obscured by the simulator window.
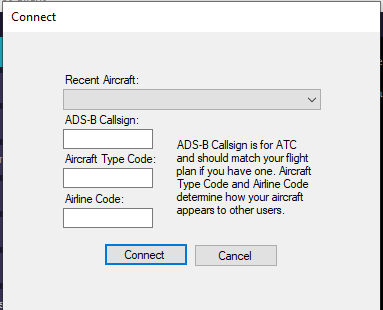
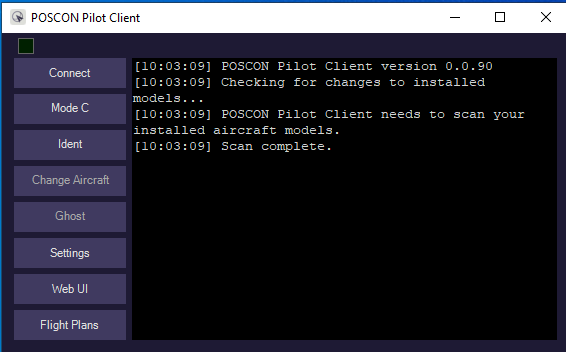
You can connect/disconnect from POSCON by clicking this button.
- Recent Aircraft - The POSCON client will remember that last 20 aircraft you logged in as. You can select a flight from this list to prepopulate the Callsign, Type, and Airline Code fields.
- ADS-B Callsign - Enter your tail number, flight number, or appropriate ADS-B ACID. This field is required to login.
- Aircraft Type Code - This is the current aircraft ICAO code that will be used when you login. If you start typing in the field a filtered list of valid type codes will appear that you can pick from using your mouse..
- Airline Code - This is the current airline ICAO code that will be used when you login. If you start typing in the field a filtered list of valid airline codes will appear that you can pick from using your mouse. Leave this field blank if you are flying as a General Aviation flight. NOTE: when flying with a registration, leave the airline code empty.
While flying on POSCON, you will need to toggle your transponder between Standby Mode, and Mode C. Mode C is used when you enter the active runway and any time you are airborne. Mode C allows controllers to see your altitude on their scope. Mode C is also used on the ground at some airports if they are using an airport surface surveillance system such as ASDE-X. This will be noted on the airport diagram or in the controller's ATIS information.
There are three ways for you to set your transponder mode with the Pilot Client.
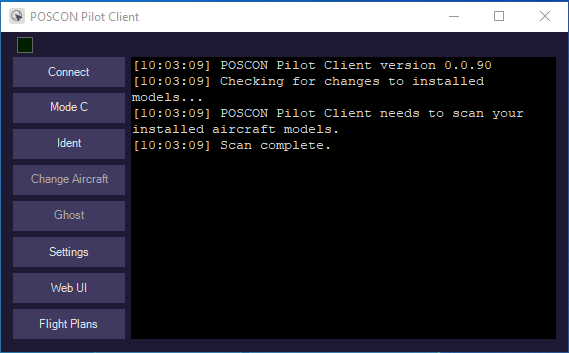
- If the add-on aircraft you are flying has SquawkBox transponder integration, then the Pilot Client will detect transponder mode changes when you toggle the mode using the aircraft panel within the sim. If this happens, you will see the Mode C button on the Pilot Client main window light up in blue when the transponder is in Mode C.
-
If the aircraft does not support SquawkBox integration, then you will need to manage the transponder mode yourself, simply by clicking the Mode C button on the Pilot Client main window. Mode C is indicated by this button being lit up in blue, otherwise it is in standby mode.
There is also a checkbox in the Settings which allows you to configure the Pilot Client such that it will automatically squawk Mode C (also referred to as "Squawking Normal") when your aircraft becomes airborne. - The final way to manage your transponder mode is by using the Add-ons menu within the sim. When the Pilot Client is running, there will be options added to this menu, allowing you to squawk Mode C or Standby.
These three options also apply for squawking ident. A controller may ask you to squawk ident when you first check in on a frequency. This causes your data tag to appear differently on his scope, helping him locate you in his airspace. If you are asked to squawk ident, you can press the ident button on your aircraft's panel (if the add-on aircraft has SquawkBox transponder integration,) or you can press the Ident button on the Pilot Client's main window, or you can choose the Squawk Ident option from the Add-ons menu within the sim.
The Ident button on the Pilot Client's main window will light up in blue when the Pilot Client has sent the ident signal to the network, at which point it will revert to the regular color.
This button is used to ghost yourself or request an un-ghosting after you have been ghosted on the network either by the server or a network moderator. More information about reasons for entering ghost mode can be found here.
If the un-ghosting request was accepted, a message will pop-up in your simulator indicating that you are no longer ghosted on the network.
This button will open a browser window to give you access to the POSCON WEB UI where you will be able to perform more advanced functions on the network.
This button will open a browser window to give you access to the POSCON Flight Plan database and filing system.
You must set the correct threshold within P3D in regards to locking frames to ensure that you are able to see other traffic refresh almost instantaneously without having any non-realistic snapping or object transporting.
To do this navigate to Options > Graphics > Display within P3D
Under Frame Rate Controls go to the Target Frame Rate section
You will find a slider and you should set it between 20 to 60 frames based upon what you know is your standard frame rate. For example if you know your system handles 30 FPS smoothly but anything more causes issues, do not set it above that 30 FPS threshold.
Do not have your slider frame rate set to unlimited because that will allow P3D to have a non-locking frame rate which means it will vary at all times and cause issues with observing changes on the POSCON Network
.png.bd2d27118bf6f37eba58ae42e7f6d95f.png)
.png.45e03b225e20f07ac7fb7b58a33872cc.png)
.png.dd872dc13caa2e50935b47271c42f6e0.png)
.png.75ebc44743f1ef910d8f56aee24be206.png)
.png.2c9a2a4b70add11908866c94023124e5.png)
.png.ffe62b7559063111c1c00f69498fa4a6.png)
.png.f09f27058cdd3e1834250fa759733acf.png)
