
Flying Stabilized Approaches

By Andrew Heath
· 14392 views
Have you ever approached an airport too high or too fast and as a result you had to dive bomb the runway in order to land? Have you ever landed halfway down the runway in an attempt to squeak out that perfect landing rate? If the answer is yes to either of these questions, then you are the victim of an unstablized approach and in the POSCON world, you lose points for that type of flying. One of the biggest operational challenges for a virtual pilot is how to successfully accomplish a stabilized approach in the simulator. In fact, flying stabilized approaches in the flight simulator is difficult for even the most experienced real world pilots because of the inherent limitations of flight simulators such the limited FOV (field of view) compared to the real world. In this post, I am going to attempt to tackle the reasons why stabilized approaches are such a challenge and offer some techniques on how to ensure your approaches remain stabilized.
For our example scenarios, we are going to John Wayne - Orange County Airport located in Santa Ana, California (KSNA). This airport has two parallel runways:
Runway 20R/2L - this is the larger of the two runways at 5,701 x 150 feet with all of it available for landing.
Runway 20L/2R - this is the smaller of the two runways at 2,887 x 75 feet with all of it available for landing.
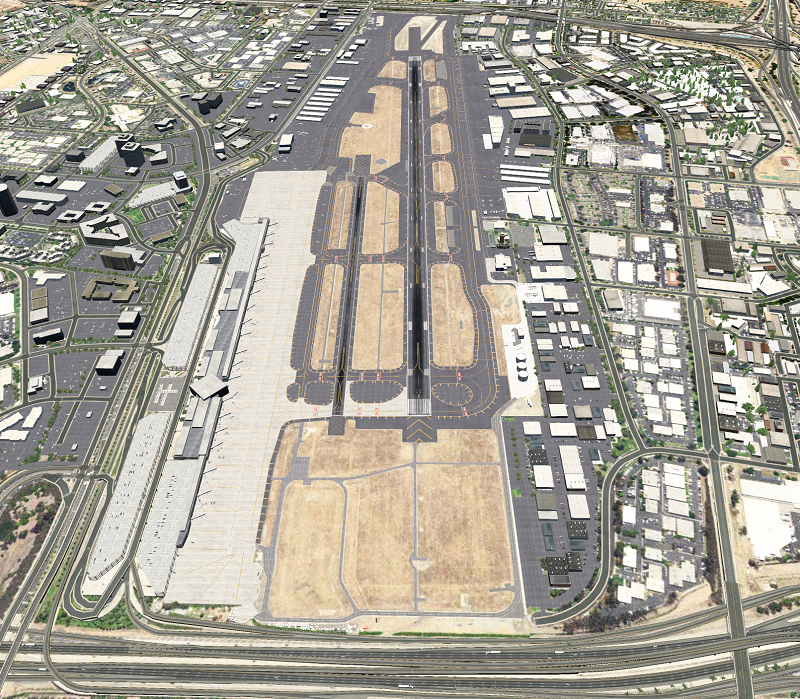
Runways 20L and 20R from X-Plane 11:
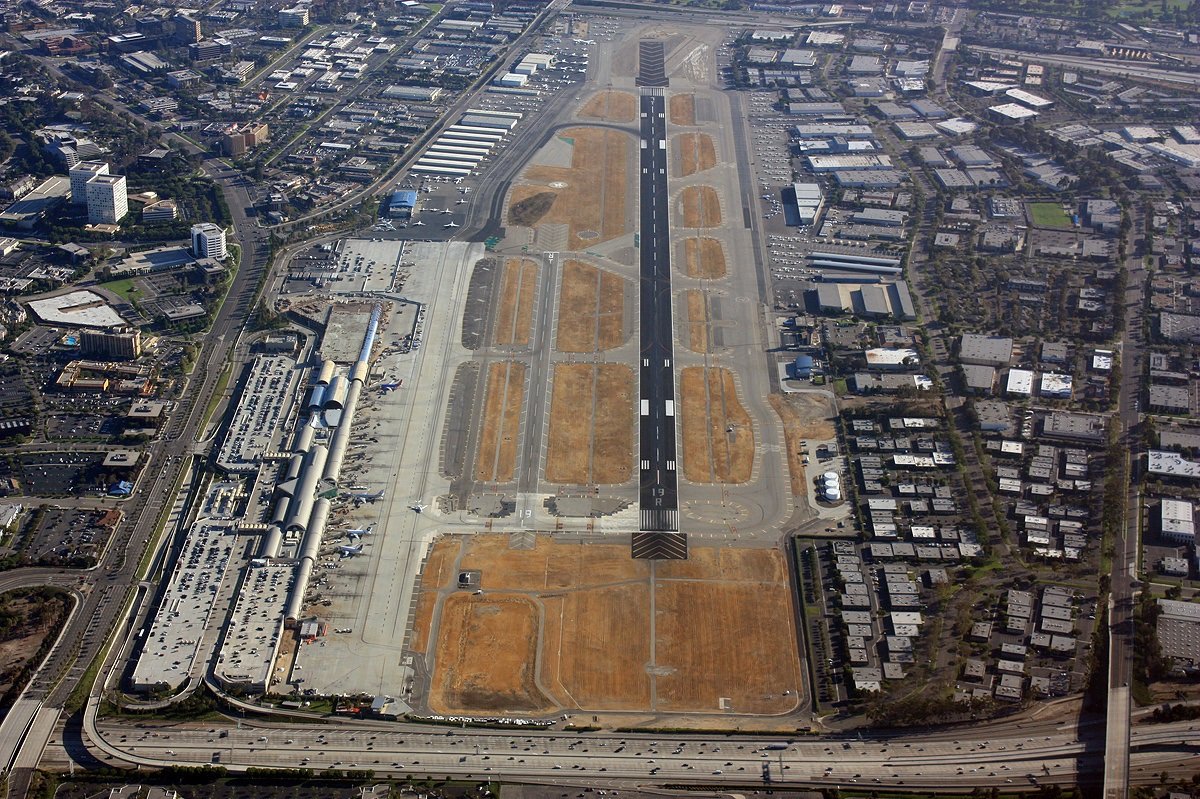
This is an old real world photo when the runways were previously named 19L and 19R.
 Not sure if you noticed, but there are two very important differences between the two photos other than the runway naming.
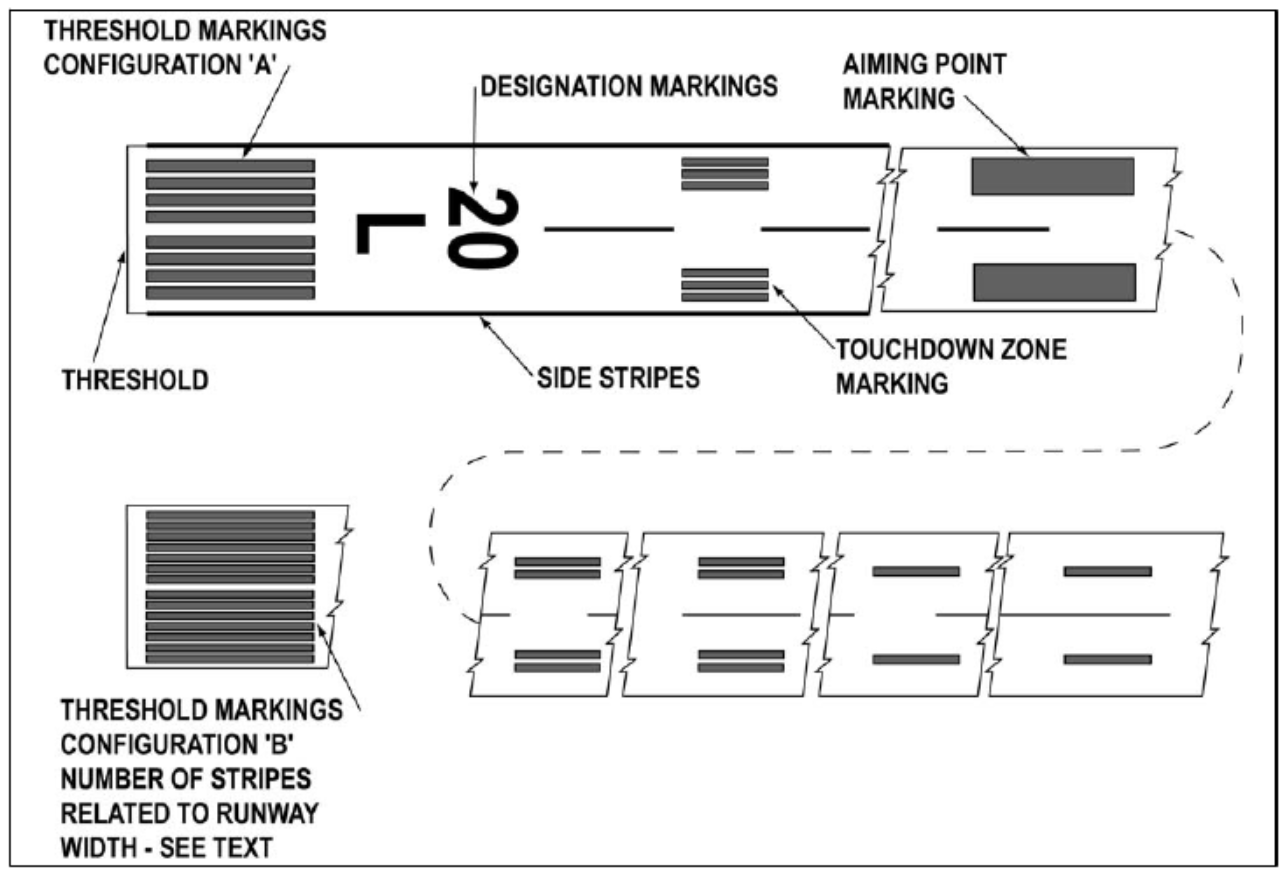
The first difference is that in the X-Plane photo, the runway touchdown zone markings extend the entire length of the runway which gives the flight simulator pilot a false sense of where the touchdown zone is located. In the real world photo, there are only three touchdown zone markings (not including the threshold markings). Each touchdown zone marking indicates 500 feet. You might ask, why are there only three in the real world? For that, lets define the term "touchdown zone".
Touchdown zone = the first 3,000 feet of a runway or first third, whichever is less.
In the case of KSNA, that means the touchdown zone is defined as the first 1,900 feet (5,701 divided by 3).
So at KSNA, the runway painters only painted 3 markings to indicate the touchdown zone (3 x 500 = 1,500). Anything more than that would give the pilot incorrect information.
The second major difference between the two photos is the fact that the X-Plane runway is simply too long. You can tell this because of the location of the third touchdown zone marking in relation to the taxiway. In the real world photo, the taxiway is located in the same position as the third marking, but in the X-Plane photo, the taxiway is located in the same position as the fourth marking.
These types of scenery inaccuracies present a significant challenge to flight simulator pilots because landing in the touchdown zone is a requirement of every landing and the expected outcome of flying a stabilized approach. If you estimate that you will NOT land in the touchdown zone, a go-around MUST be initiated. POSCON will automatically deduct points from your score if you fail to land within the touchdown zone because it is indicative of an unsafe landing.
We now know what the touchdown zone is and why it is important, but to achieve a safe landing in the touchdown zone, it first starts with a stabilized approach. Significant speed and configuration changes during an approach can complicate aircraft control, increase the difficulty of evaluating an approach as it progresses, and complicate the decision at the decision point (i.e., DA, DDA, DH, MDA). Assess the probable success of an approach before reaching the decision point by determining the requirements for a stabilized approach have been met and maintained. Normal bracketing is defined as small corrections in airspeed, rates of descent, and variations from lateral and vertical path. Normal bracketing is a part of any instrument or visual approach procedure. Frequent or sustained variations are not normal bracketing excursions and are not acceptable. POSCON will automatically deduct points from your score if you fail to conduct a stabilized approach; however, you will only be charged points if the approach results in a landing. If you realize you are unstable and go-around without touching down, no points will be deducted. Let's review the criteria the POSCON grades on:
Stabilized Approach Requirements
On any approach, the following is required:
- Below 2,000 feet above field level, do not descend at a rate greater than 2,000 FPM for more than a few seconds.
- Below 1,000 feet above field level, or inside the FAF, do not descend at a rate greater than 1,000 FPM for more than a few seconds.
EXCEPTION: At special airports such as Lukla (VNLK), Telluride (KTEX), Aspen (KASE), Paro Bhutan (VQPR), etc. OR if you are simulating an emergency, you can "dispute" the point deduction in order to be exempt from the above criteria. We also are considering exempting certain aircraft types as well such as general aviation.
At 1,000 feet above field level:
- You must be in a landing configuration (gear down and final landing flaps), no exceptions.
- On the proper flight path.
- At stabilized thrust (spooled).
- Minimum speed: target speed minus 5 knots.
- Maximum speed: target speed plus 10 knots.
EXCEPTION: In VMC, the requirements at 1,000 feet can be delayed until 500 feet above field elevation, except landing configuration.
These requirements must be maintained throughout the rest of the approach for it to be considered a stabilized approach. If the stabilized approach requirements cannot be satisfied by the minimum stabilized approach heights or maintained throughout the rest of the approach, then you must execute a go-around. The decision to go around is not an indication of poor performance, but rather good judgement.
Main Causes of Unstabilized Approaches
- Visual approaches.
- Poor descent and speed planning from cruise.
- Unreasonable ATC speed or altitude restrictions.
Techniques to Flying a Stabilized Approach
Here are some tips on how to achieve a stabilized approach:
-
Stabilized approaches start with good descent and speed planning.
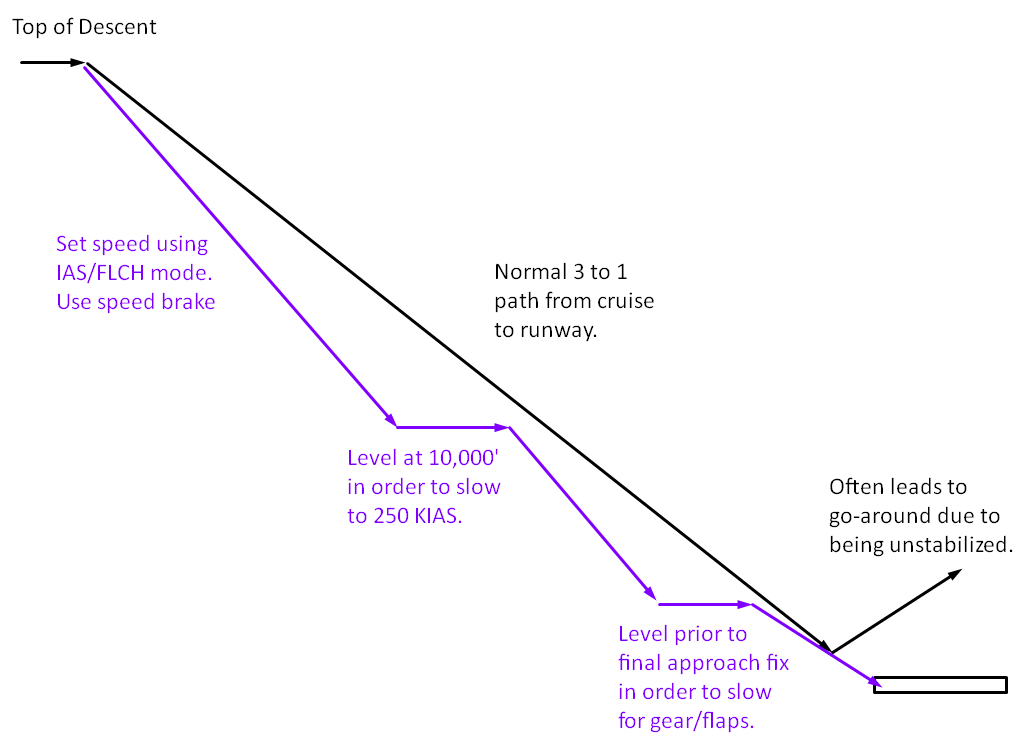
- The total flying distance required for a normal descent to landing can be calculated by factoring 3 miles per 1,000 feet or 1 mile per 300 feet (3 to 1 ratio). Sometimes, however, a 3 to 1 ratio cannot be maintained due to high tailwinds, engine anti-ice activation, or ATC assigned speed restrictions. If you are flying jet aircraft, make sure you are not afraid to use speed brakes when necessary as they are a very effective tool to "go down and slow down" simultaneously. If you are in variable pitch prop aircraft, you can push the prop lever full forward which will use the blade of the prop to help slow the aircraft.
- The best way to slow an aircraft in the descent is to level. It is not always possible, but when it is, it is good practice to build in a few extra miles prior to a speed restriction to level just to make sure you can achieve the desired speed. If the act of leveling gets you off your desired descent path (i.e. too high), you can always add flaps to maintain a high descent rate while maintaining a slow speed. Speed brakes can also help, but avoid using speed brakes below 180 KIAS.
- Extending your gear is your trump card... play it when necessary. The gear is the biggest drag device you have on your aircraft. If the choice is between going around and dumping the gear early, the gear is always the best option.
- 1,000 feet is just a minimum. You should target 1,500 feet to ensure you are stable by 1,000 feet. In general, plan to be stabilized on all approaches by 1,000 feet above field level in both IMC and VMC.
-
Use electronic guidance when available. This does NOT mean you need to request to fly the instrument approach, you can simply tune and backup your visual approach using an ILS or RNAV for the vertical guidance that these approaches provide.
- A good technique on visual approaches is to intercept the vertical path, even if not established on the lateral guidance.
- If ATC assigns you an altitude or speed restriction you are unable to maintain, then simply say "unable".
- Know how to properly manipulate the the mode control panel (MCP) or guidance panel (GP) on your aircraft. Knowing what the different modes do will help you make good decisions during the descent phase. Also, it is important to understand how each mode interacts with your auto-throttle system. The last thing you want is the auto-throttles to increase power when you are not ready for them to do so.
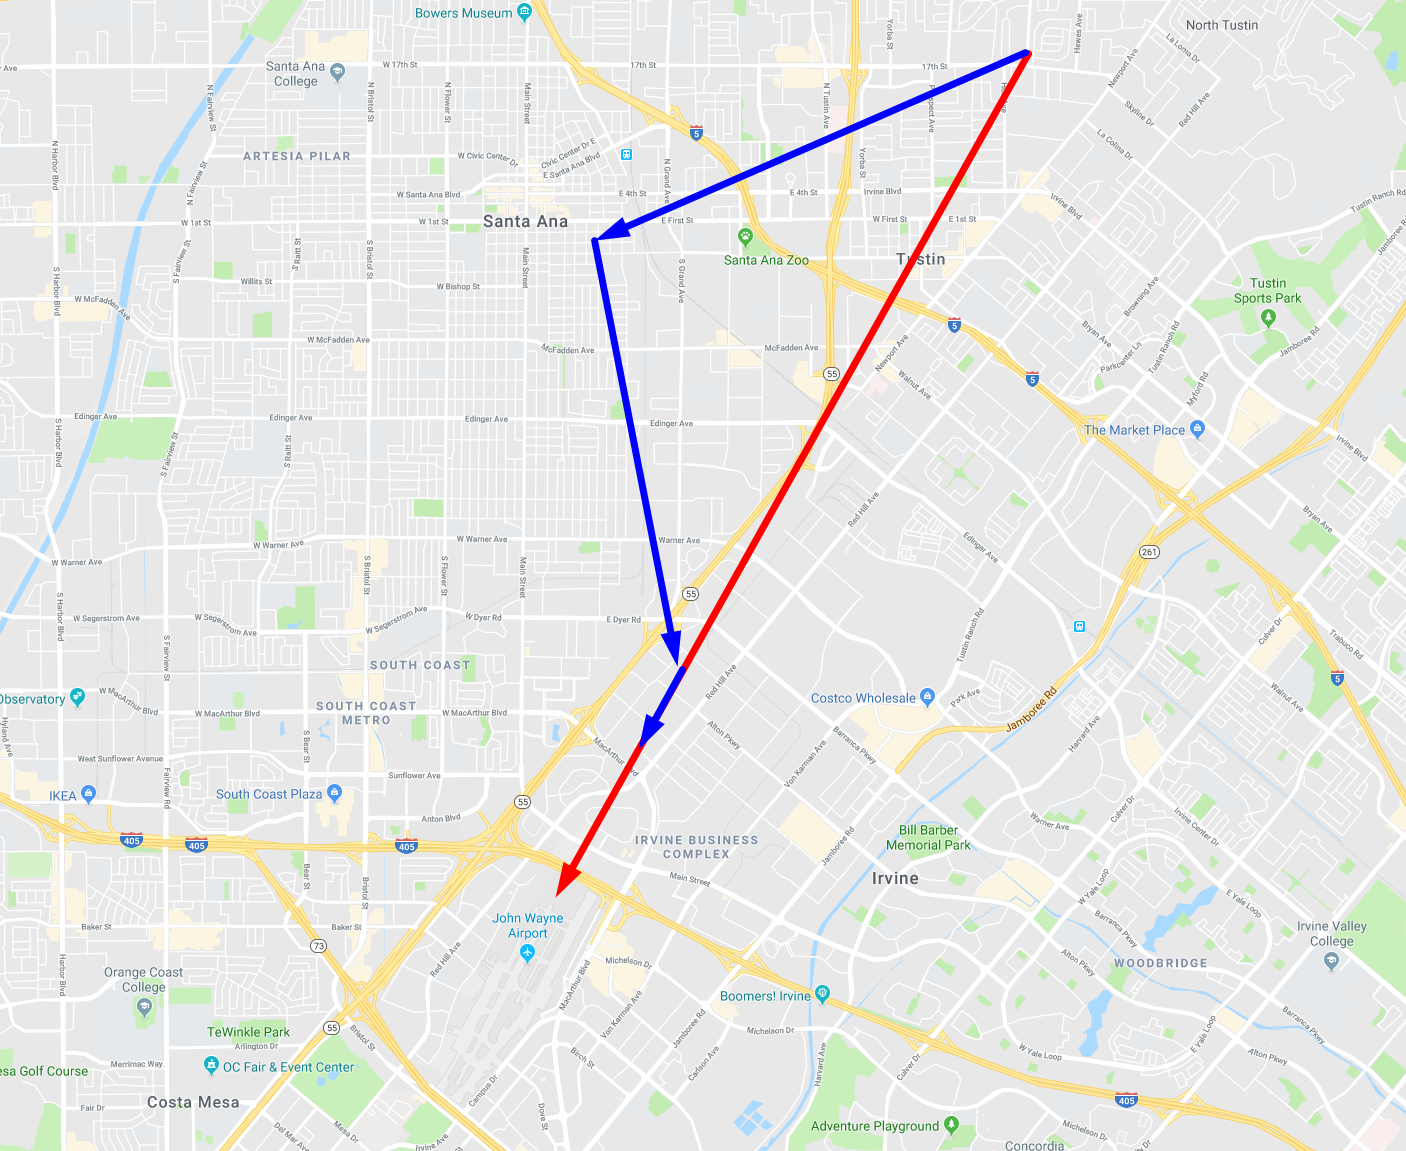
Here is an example of what to do when you recognize early that a 3 to 1 ratio descent path is not going to work:
Okay, now lets say you have tried ALL of the above and you are out of options, what now? Do you have to go-around?
There is one more option... increase the flying distance to the runway. You can do this a number of different ways, but it depends on how far away you are from the runway.
Early recognition of being unstable: If you realize early that you are going too high and/or fast on approach, you can ask ATC for "vectors for descent". 99% of the time ATC will be happy to accommodate this request because they rather give you a chance to make a stabilized approach than have to deal with your go-around.
Late recognition of being unstable: If you realize that you are going to be high and/or fast and you are on final approach, then things become a little bit more complicated. With the exception of the C172-type aircraft and their ability to forward slip, the only option is an S-turn... yeah, that thing from the private pilot training. If you are flying into a controlled airfield, you need to request to conduct this maneuver from ATC. If you are flying into an uncontrolled field, you can simply perform this maneuver on your own.
CAUTION: Some people may suggest a 360 degree turn for stabilization on final as it is common practice at uncontrolled fields. I personally do not recommend this maneuver as it can lead to bad things if aircraft are behind you. If you feel that the S-turn technique will not work, it is better to just level at pattern altitude, fly upwind and then re-enter the traffic pattern.
The S-Turn Technique
The shortest distance between two points is a straight line, thus if you want to increase the distance to a runway (i.e. the time to descend and slow), you need to add a bend in your flight path. In order to do this, first make sure you are above 1,000 feet above field level and in VMC. If not, you need to go around and try the approach again. If you are, I recommend the following technique:
- Turn 30-45 degrees off course.
-
Maintain throttles to idle.
- If you are too high: pitch for maximum vertical descent rate based on height above field level (e.g. do not exceed 2,000 FPM below 2,000 feet AFL or 1,000 FPM below 1,000 AFL).
- If you are too fast: pitch for desired airspeed.
- Evaluate your glide path using visual or electronic means.
-
When you feel comfortable with the stability of your approach, turn back towards the airfield and intercept the straight-in final.
- CAUTION: Do not let the maneuver deviate more than 1 mile from the straight-in lateral track, otherwise you might as well go around and re-enter the pattern.
-
 2
2

Recommended Comments