Support Documents
Welcome to POSCON! The purpose of this document is to provide a basic overview of POSCON software and how to get connected for the very first time.
If you are a member returning to POSCON for the first time in a very long time (i.e. prior to December 2021), please see Returning Old Members before doing anything else.
If you haven't already reviewed our Network Policies, we suggest you take some time to either review them now, or after reading through this support document.
The first step will be to create your account on our HQ website link to register. If you have already done this, can skip this step.
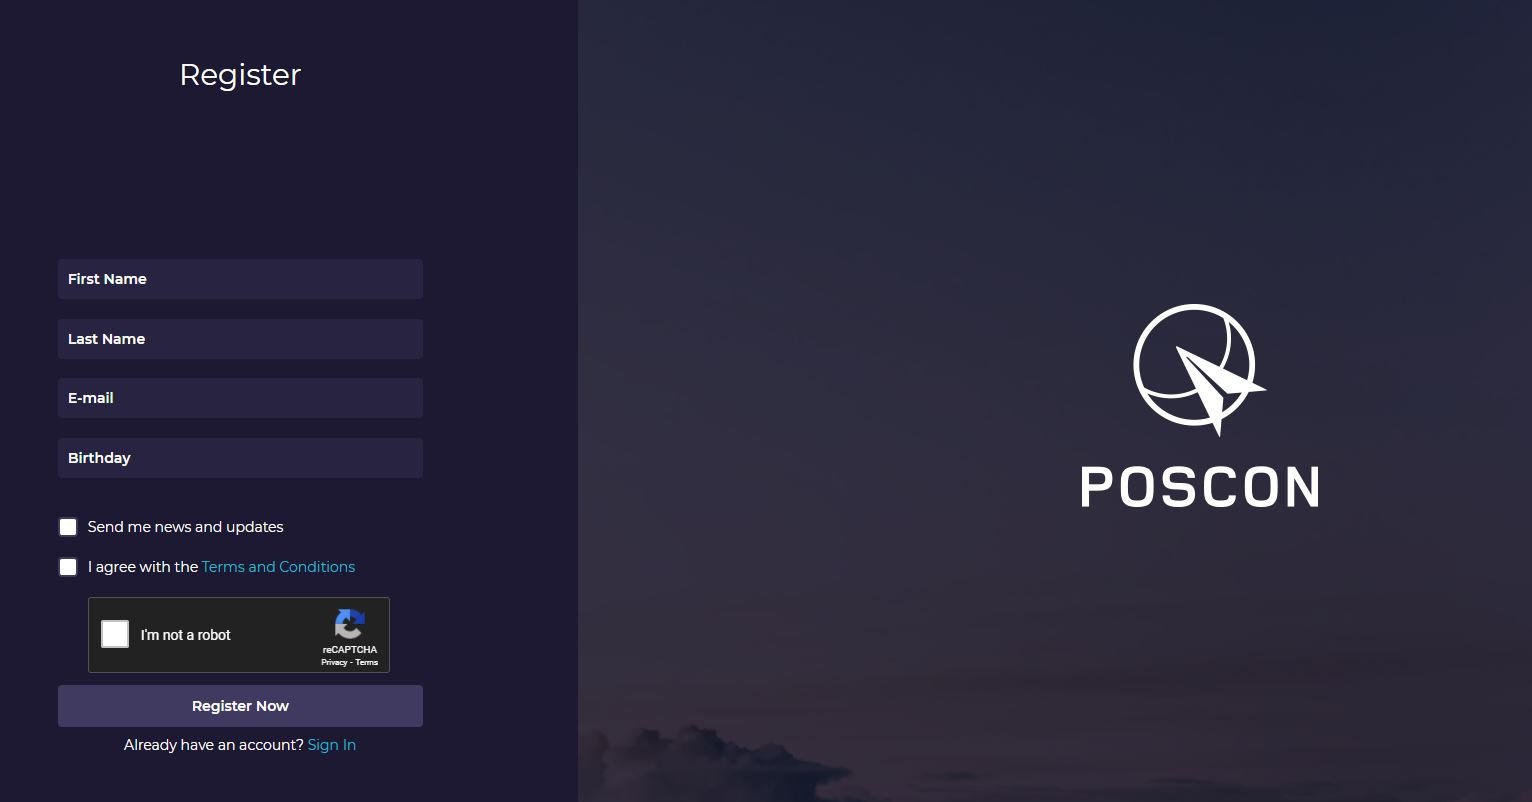
To register on POSCON, all you need to do is to fill out the appropriate sections with the appropriate information and you'll be all set on the first step. Make sure that you read the Terms and Conditions before clicking on "Register Now".
NOTE: Make sure your first name, last name, and birthday are all accurate! You will not be able to change these once you register without contacting POSCON Support.
If you are under 16 years old, you need to comply with our Minors Policy which involves additional steps.
Download the POSCON Launcher Client. This software has three purposes:
- It is used to download and update client software, which is used to connect.
- It contains the voice software, which is used to talk to pilots and air traffic controllers.
- It keeps you authenticated.
Because of the above purposes, the Launcher Client must remain running at all times.
If the above link does not work or you need to get to the Launcher Client download again in the future, visit the POSCON HQ. You can either find the download in the "More Menu" and then click "Launcher Download" or the download icon in the top-right corner.
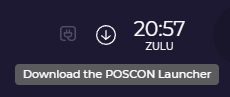
After downloading, locate and install the EXE file. At the end of the installation process, there will be the following icon on your desktop:

You now have the POSCON Launcher Client installed on your computer. It should launch automatically, if not click the shortcut to open the application. Once opened, it will ask you to login with your POSCON user ID and password.
After logging in, you will see a pop-up like this:
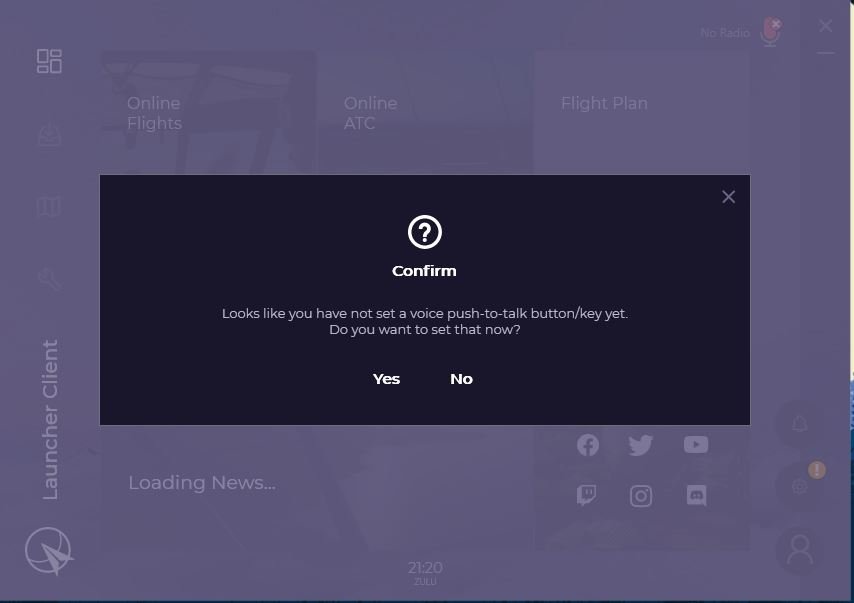
This step should only be necessary the first time.
You want to click Yes. The following window will appear:
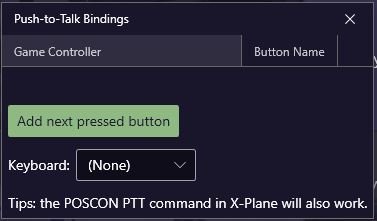
You can add a joystick button and/or a keyboard key you wish to use for transmitting voice on the network.
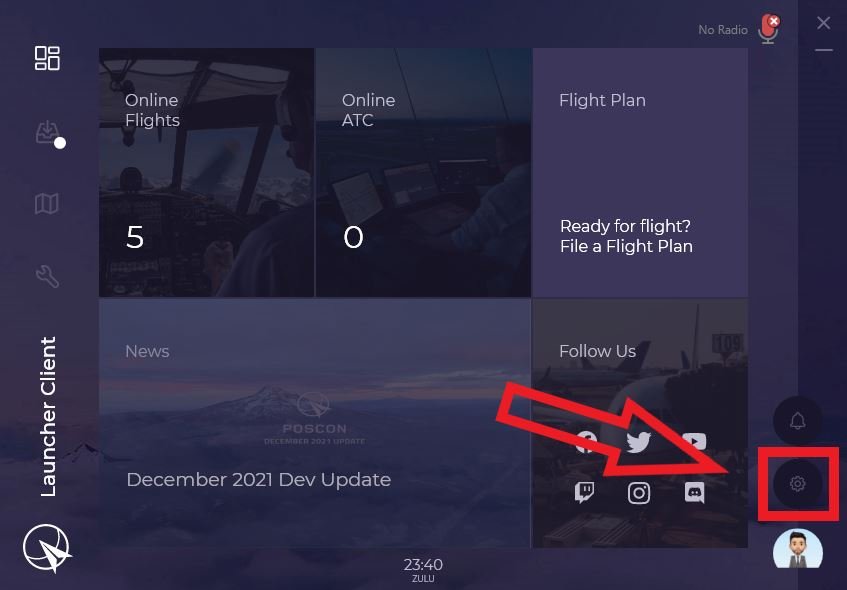
Next, click on the Settings Icon to modify your Capture Devices (microphones) and Render Devices (speakers/headsets):
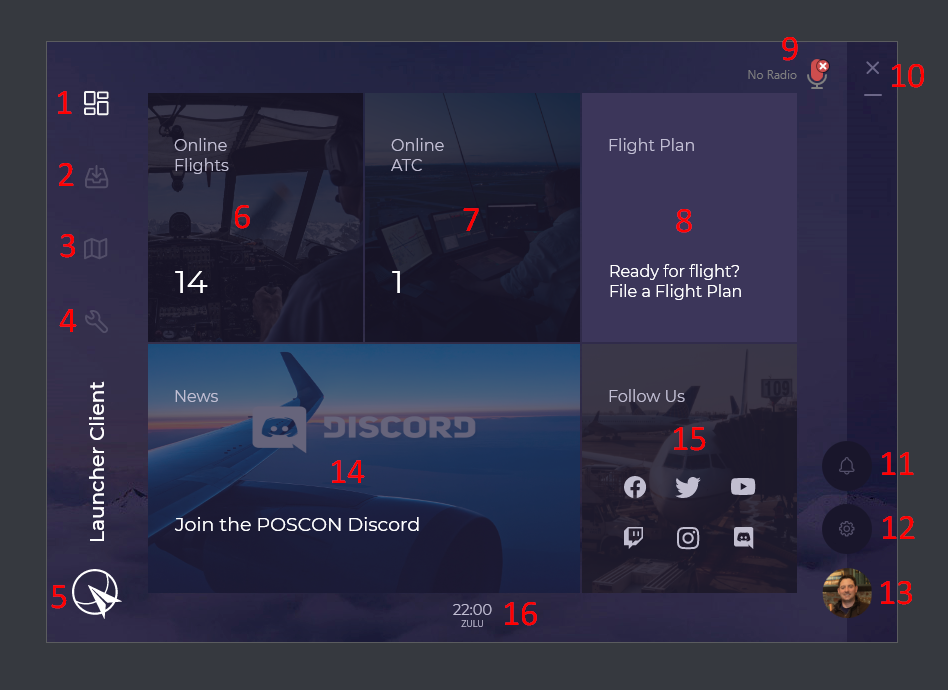
1. Dashboard Icon: If you are on any other page than Dashboard, this button will return you to the dashboard.
2. Library Icon: This button will take you to the page that contains POSCON software.
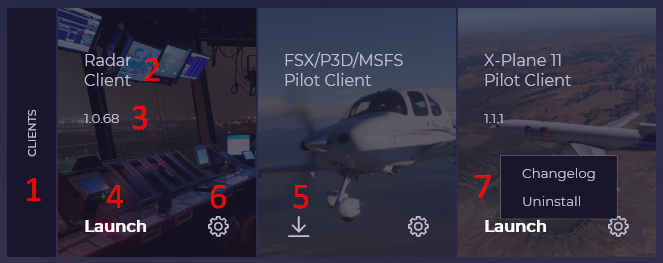
- Software Category
- Name of Software
- Version Number
- Launch/Update Button. Will say "Launch" if the software is up-to-date and ready to be launched. Will say "Update" if the software requires updating. Will show the download icon if the software hasn't been downloaded (see #5). Clicking on the button will execute the the respective task.
- Download Icon
- Settings Icon. Clicking this opens the sub-menu (see #6 below).
- Settings Sub-Menu. "Changelog" will open your default web browser and load the changelog for the respective client. "Uninstall" will uninstall the software from your computer.
If you see the following icon, it means that there is software in the Library that requires updating:
![]()
3. Live Map Icon: This button will open up your default web browser and load the POSCON Live Map, which will show the location of online pilots and air traffic control.
4. Support Icon: This button will bring you back here, to the Support Documents.
5. POSCON Logo: This button will open up your default web browser and load the POSCON HQ Dashboard.
6. Online Flights Pane: This section of the Launcher dashboard will show you the currently connected flights, including ghosted traffic. If you click on the pane, it will open up your default web browser and load the POSCON Live Map, which will show the location of online pilots and air traffic controllers.
7. Online ATC Pane: This section of the Launcher dashboard will show you the currently connected air traffic controllers. If you click on the pane, it will open up your default web browser and load the POSCON Live Map, which will show the location of online pilots and air traffic controllers.
8. Flight Plan: If you click on this pane, it will open up your default web browser and load the Flight Plan (FPL) form. Use this to file flight plans on the POSCON Network.
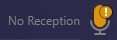
9. Voice Status Indicator: The Launcher Client also incorporates a new voice status icon located in the upper right-hand corner of application which gives users an indication of the microphone and the radio configuration. Here are the different states:

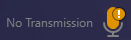
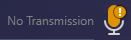
You are not connected to POSCON (or the voice server) or your airplane radios are not powered (perhaps your avionics are turned off).
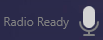
Your radios are configured correctly, but you are not currently transmitting.
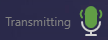
You are transmitting and listening on a frequency.
Your radios are set up to transmit, but not to listen.
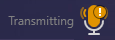
Same as above, but your push-to-talk button/key is pressed
Your radios are set up to listen, but not to transmit. This can happen when you are in Ghost mode or if you don't have your radios configured to transmit on a frequency.
Same as above, but your push-to-talk button/key is pressed
In all cases, remember you can use the Pilot Client Web UI ("RADIOS" page) to get better insight into what is happening with the configuration of your radios.
10. Minimize Options: These two icons are used to minimize the Launcher Client. The horizonal dash minimizes the Launcher Client as you would normally expect. The "X" located in the top right-hand corner of the Launcher Client minimizes the Launcher Client to the system tray. A notification will remind you that the Launcher has not fully exited, but is instead running in the system tray. To exit the Launcher Client, you need right-click on the icon in the system tray. The following options appear:
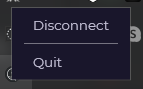
- Disconnect: Will disconnect you from the POSCON Network if you are connected via any Pilot Client or Radar Client.
- Quit: Will shutdown the Launcher Client.
11. Notifications Icon: This will be where you can receive notifications from POSCON (not currently implemented).
12. Settings (Cog Wheel) Icon: This button will open up the Launcher Client settings. If you failed to set your push-to-talk (PTT) button or key, you will see the following on your settings cog wheel logo:

To rectify the issue, simply click on the cog wheel logo and click on "Push-to-Talk Bindings" to set the button and/or key. You must have at least one set at all times.
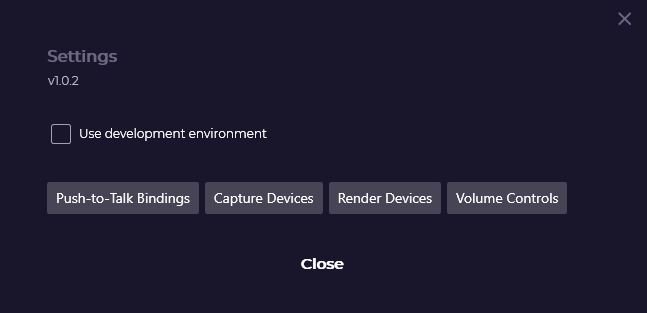
Here is what the settings menu looks like when opened:

- This is the current version of the Launcher Client.
- This is for beta testers only. Regular users will not see this option.
-
Clicking this will open up a sub-menu that will allow you set multiple push-to-talk buttons. You can set multiple joystick buttons and/or you can set one keyboard key. See the section Install the Launcher Client for more details.
Click for Push-to-Talk Bindings Sub-Menu
-
These are your microphone settings.
Click for Capture Devices Sub-Menu
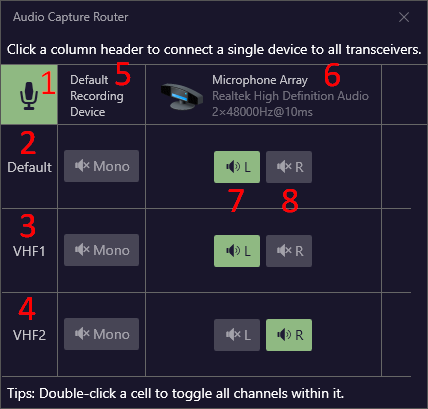
- Clicking on this will bring up your PC's default microphone settings.
- This row designates what device you want to use as default.
- This row designates what device you want to use to transmit on VHF radio #1.
- This row designates what device you want to use to transmit on VHF radio #2.
- Default
- Each column designates a microphone device on your computer. Double clicking this area will connect a single device to all transceivers.
- This designates the LEFT channel of the microphone.
- This designates the RIGHT channel of the microphone.
- These are your speaker settings.
- These are your volume controls.
13. Profile Avatar: This image is the same image that you set in your profile on the POSCON HQ. When clicked, a sub-menu opens:
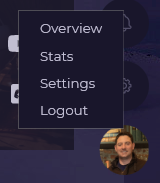
- Overview: Opens your default browser and loads your Profile Overview page.
- Stats: Opens your default browser and loads your Profile Stats page.
- Settings: Opens your default browser and loads your the Profile Settings page.
- Logout: Logs you out of POSCON and closes the Launcher.
14. News Pane: This section of the Launcher Dashboard shows the most recent POSCON news. If you click on one of the news items, it will link you to the respective article.
15. Follow Us (Social Media) Pane: This section contains links to our social media feeds.
16. Clock: This is the current time in Universal Coordinated Time (UTC), aka "Zulu" time.
For users of FSX/P3D/MSFS (SimConnect), please use the following instructions to install the Pilot Client:
- Client is to click on the Library Icon.
- Click on the Download Icon under FSX/P3D/MSFS Pilot Client pane.
- A pop-up should appear confirming that you're about to install the FSX/P3D/MSFS Pilot Client. Click the Install Button
- Make sure to click Yes when it asks if you to install required runtime files.
- After the download is completed, click the Close Button.
- Click the Launch Button under the FSX/P3D/MSFS Pilot Client pane.
- A confirmation message will appear asking if you indeed what to launch the client, click Yes.
When you launch the client, a window like this should appear:
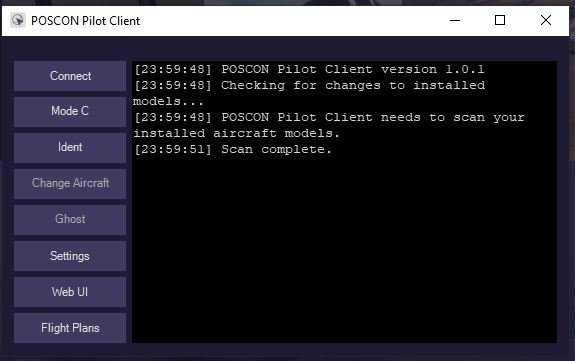
Now that you've successfully installed the SimConnect Pilot Client, it's time for you to launch your simulator software (FSX, P3D or MSFS). Once done and ready to connect to the network, click the Connect Button. The following menu will appear:
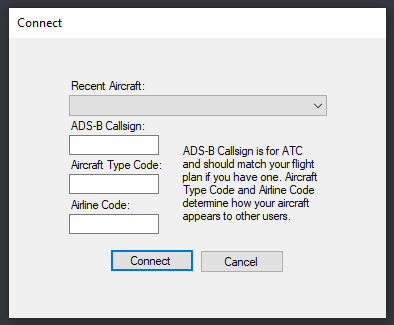
- ADS-B Callsign: If you conducting a general aviation flight, this should be registration (tail number) of the aircraft you are flying. If you are conducting an airline flight, this should be a valid ICAO airline code + flight number (e.g. AAL2123). In all cases, this should match what you put in the "Aircraft ID" section of any flight plan you file on POSCON.
- Aircraft Type Code: This should match a valid ICAO aircraft type code.
- Airline Code: If you are conducting a general aviation flight, leave this blank. If you are conducting an airline flight, this should be the same ICAO airline code used in the ADS-B Callsign field.
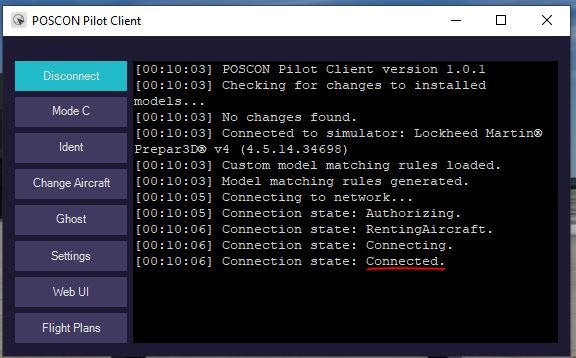
Once the above form is filled out, click the Connect Button and you will connect to the network. If everything is successful, you'll see the following lines appear on the client:
IMPORTANT NOTES:
- If you haven't completed the Welcome to POSCON computer-based training module, you will be automatically Ghosted, meaning you cannot be seen or heard by any other pilots on the network. This module takes approximately 20 minutes to complete.
- If you have completed the Welcome to POSCON computer-based training module, but you connected on a runway, in pause mode, or in slew mode, you will be Ghosted. To rectify the issue, remove yourself from the the runway, unpause, or exit slew mode.
- Remember, the Launcher Client always has to be running to keep you authenticated to the POSCON Network.
What to learn more? If you need more information on our SimConnect Pilot Client you can read the FSX/P3D/MSFS Pilot Client User Manual.
Ready for your first flight? Check out this guide to flying your First Flight on POSCON.
For users of X-Plane, please use the following instructions to install the Pilot Client:
- Client is to click on the Library Icon.
- Click on the Download Icon on X-Plane Pilot Client pane.
-
A pop-up should appear confirming that you're about to install the X-Plane Pilot Client. There is an optional setting that allows you to install the POSCON version of the AutoSpeed Lua script (FlyWithLua plugin required). This script is important if your computer cannot maintain an average of 20 FPS (see X-Plane Pilot Client User Manual for more details). Either leave this optional setting checked or uncheck then click the Install Button.
- NOTE: With a slow internet connection, this download could take a significant amount of time, have patience.
- After the download is completed, click the Close Button.
- Click the Launch Button on the X-Plane Pilot Client pane.
- A confirmation message will appear asking if you indeed what to launch the client, click Yes.
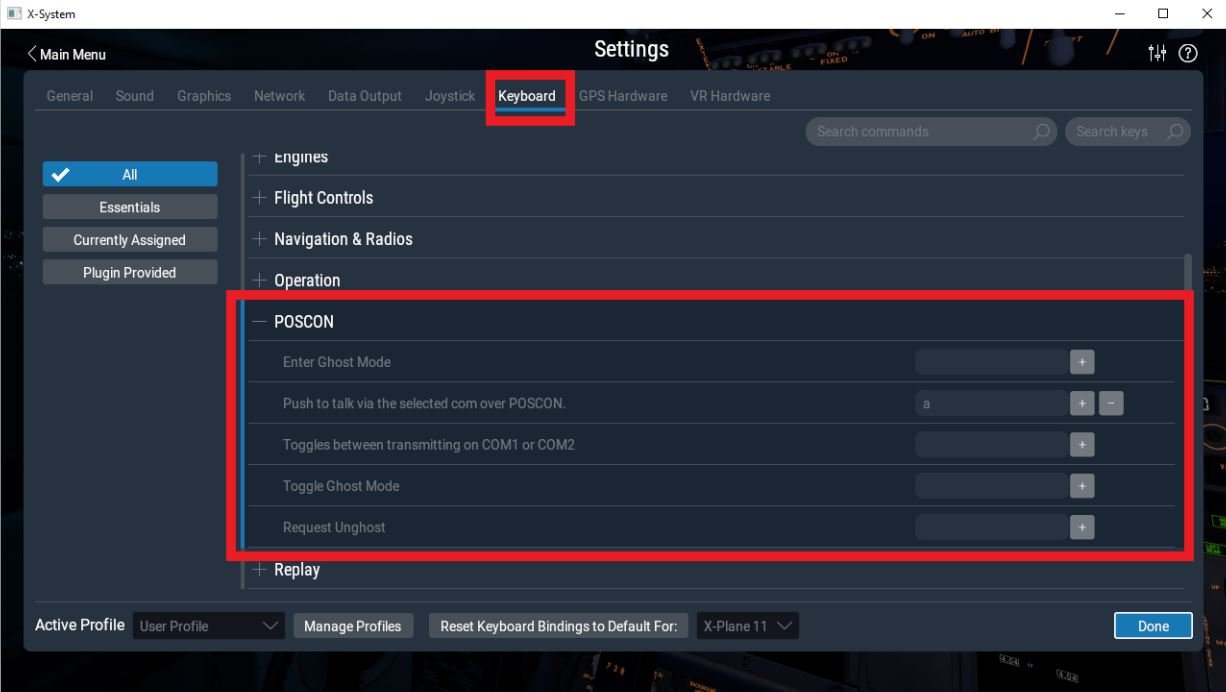
The X-Plane Pilot Client allows users to set up a few key/button bindings within X-Plane itself. You can find these bindings in the X-Plane settings menu under the "Joystick" and "Keyboard" sections. Search for "POSCON" and you'll find a drop down menu with specific settings available. If you set a push-to-talk (PTT) in this menu, it simply acts as an additional PTT button to the one you set in the Launcher Client.
After you are done setting up X-Plane specific settings, navigate via the X-Plane menu to "Plugins > POSCON > Login" and a pop-up window will appear:
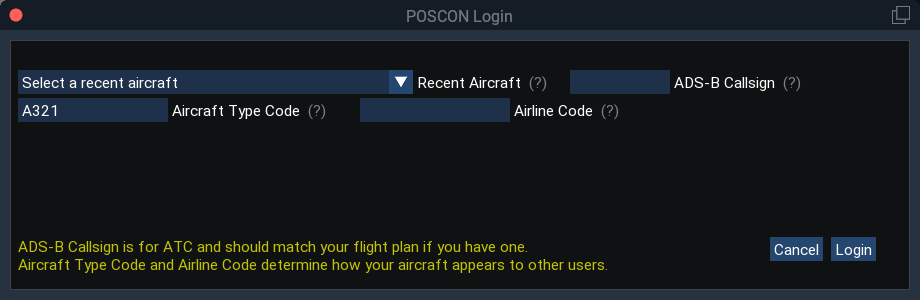
- ADS-B Callsign: If you conducting a general aviation flight, this should be registration (tail number) of the aircraft you are flying. If you are conducting an airline flight, this should be a valid ICAO airline code + flight number (e.g. AAL2123). In all cases, this should match what you put in the "Aircraft ID" section of any flight plan you file on POSCON.
- Aircraft Type Code: This should match a valid ICAO aircraft type code.
- Airline Code: If you are conducting a general aviation flight, leave this blank. If you are conducting an airline flight, this should be the same ICAO airline code used in the ADS-B Callsign field.
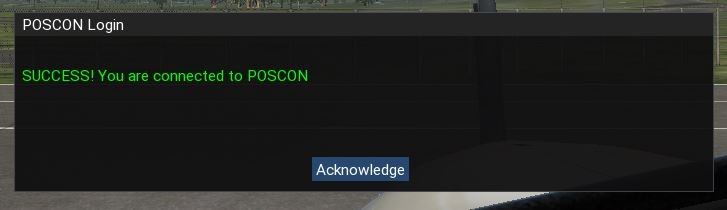
Once the above form is filled out, click the Login Button and you will connect to the network. If everything is successful, you'll see the following pop-up:
IMPORTANT NOTES:
- If you haven't completed the Welcome to POSCON computer-based training module, you will be automatically Ghosted, meaning you cannot be seen or heard by any other pilots on the network. This module takes approximately 20 minutes to complete.
- If you have completed the Welcome to POSCON computer-based training module, but you connected on a runway, in pause mode, or in slew mode, you will be Ghosted. To rectify the issue, remove yourself from the the runway, unpause, or exit slew mode.
- Remember, the Launcher Client always has to be running to keep you authenticated to the POSCON Network.
What to learn more? If you need more information on our X-Plane Pilot Client you can read the X-Plane Pilot Client User Manual.
Ready for your first flight? Check out this guide to flying your First Flight on POSCON.