Support Documents
Welcome to the chapter on how to perform your first flight on POSCON. At this stage you have the client already installed on your computer and you're ready to do your first flight. If you haven't downloaded our client please visit this section to have a step by step on how to install our POSCON client software: New to POSCON
The first step before launching your flight sim platform would be to file a flight plan (note: if flying VFR, depending on the country your not in obligation to file one.). You can access the flight plan filing page here: Create a flight plan. You can read this section here: Flight plans to see how to correctly file a flight plan before your flight. Note that Flight plans can be filed as early as 5 days prior to intended DOF and Departure Time.
After filing the flight plan, you'll get a small flight briefing about your flight your about to perform. For this example we filled a flight between Montreal (CYUL) and Mexico City (MMMX):
What's important to note is your CTAF frequency (Number 1) which is the frequency you should communicate your intentions on when no ATC is available.
Also so airports have an Advisory Chart available in a PDF format which gives more information's about the airport and some procedures.
In conclusion to this point, after you file your flight plan and you noted all the necessary info, you'll see that your flight plan is pending activation. It's now time to move to the next step. Note that Up to 35 minutes prior to filed Departure Time, the flight plan can be edited. At 35 minutes prior to filed Departure Time or current time, whichever is later, the flight plan is sent to ATC for processing and editing is locked to the pilot user.
Now that your flight plan is filled on the network you can open up the Launcher. It's important that you make sure to leave the launcher opened during your entire flight. You can minimize the launcher window but don't close it. You can also check if either your P3D or XP11 connect client is up to date.
If everything is up to date you'll have the Launch option.
Connect to the network with FSX/P3D:
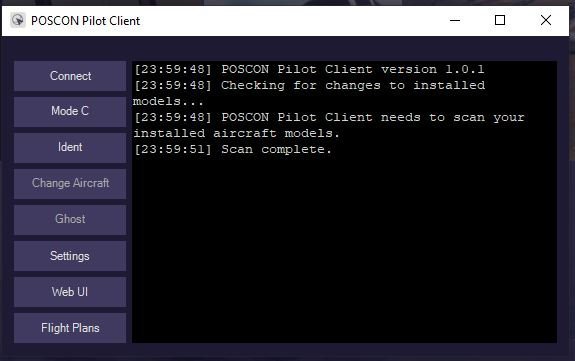
To launch the pilot client you need to click on the launcher. Then a window like this should pop up:

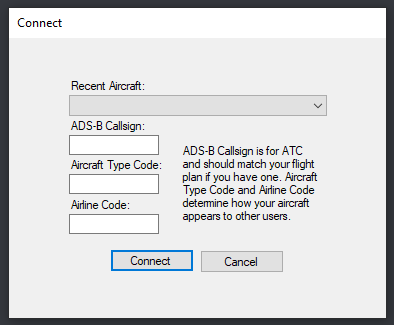
click the Connect Button. The following menu will appear:

- ADS-B Callsign: If you conducting a general aviation flight, this should be registration (tail number) of the aircraft you are flying. If you are conducting an airline flight, this should be a valid ICAO airline code + flight number (e.g. AAL2123). In all cases, this should match what you put in the "Aircraft ID" section of any flight plan you file on POSCON.
- Aircraft Type Code: This should match a valid ICAO aircraft type code.
- Airline Code: If you are conducting a general aviation flight, leave this blank. If you are conducting an airline flight, this should be the same ICAO airline code used in the ADS-B Callsign field.
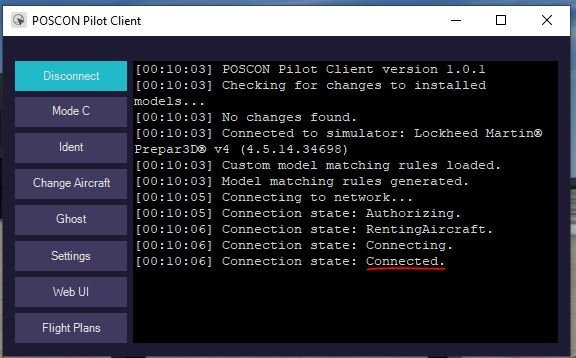
Once the above form is filled out, click the Connect Button and you will connect to the network. If everything is successful, you'll see the following lines appear on the client:

IMPORTANT NOTES:
- If you haven't completed the Welcome to POSCON computer-based training module, you will be automatically Ghosted, meaning you cannot be seen or heard by any other pilots on the network. This module takes approximately 20 minutes to complete.
- If you have completed the Welcome to POSCON computer-based training module, but you connected on a runway, in pause mode, or in slew mode, you will be Ghosted. To rectify the issue, remove yourself from the the runway, unpause, or exit slew mode.
- Remember, the Launcher Client always has to be running to keep you authenticated to the POSCON Network.
Connect to the network with X-Plane 11:
Navigate via the X-Plane menu to "Plugins > POSCON > Login" and a pop-up window will appear:

- ADS-B Callsign: If you conducting a general aviation flight, this should be registration (tail number) of the aircraft you are flying. If you are conducting an airline flight, this should be a valid ICAO airline code + flight number (e.g. AAL2123). In all cases, this should match what you put in the "Aircraft ID" section of any flight plan you file on POSCON.
- Aircraft Type Code: This should match a valid ICAO aircraft type code.
- Airline Code: If you are conducting a general aviation flight, leave this blank. If you are conducting an airline flight, this should be the same ICAO airline code used in the ADS-B Callsign field.
Once the above form is filled out, click the Login Button and you will connect to the network. If everything is successful, you'll see the following pop-up:

IMPORTANT NOTES:
- If you haven't completed the Welcome to POSCON computer-based training module, you will be automatically Ghosted, meaning you cannot be seen or heard by any other pilots on the network. This module takes approximately 20 minutes to complete.
- If you have completed the Welcome to POSCON computer-based training module, but you connected on a runway, in pause mode, or in slew mode, you will be Ghosted. To rectify the issue, remove yourself from the the runway, unpause, or exit slew mode.
- Remember, the Launcher Client always has to be running to keep you authenticated to the POSCON Network.
To activate your flight plan you need to know in which FIR/UIR you're in and your callsign. You can easily get those information right after you filled your flight plan.
Next you need to go on the HQ website and see on the left column the Web UI logo.
Since your connected on the network you will be able to click on those buttons. Step 1 to get your squawk code would be to click on the ATC button.
Step 2 would be to click on LOGON/STATUS:
Step 3 to enter your FIR/UIR your currently departing from and your callsign under it.
Once done you can click send at the bottom. After a few seconds you should receive a new message like this. This mean that your flight plan is now link to your aircraft.
But it's not over, on step 4 you need to go back on the ATC page and click on Clearance Request:
On that page all you have to do is click on the small box and click send.
After a few seconds you should receive a second new message this one containing your squawk code that you would need to set prior to push back.
It's very important! That you click on this message and acknowledge your squawk code. Failed to do so can result on your flight plan not being track while flying.
After this you're all set! Your flight plan will activate once airborne and you can track your status on the Live Map.
If your using P3D/FSX and you wish to perform your flight under ghost mode you can do the following steps:
On the main window of the client click Ghost:
And then you should get the confirmation that you're indeed on ghost mode with the following message on the client or pop up in your sim:
If on the other hand your using x-plane 11 you can access ghost mode this way:
Go on the top bar and select the POSCON menu. On the sub-menu you should see an option called Ghost. Click on it:
Then you should have a pop up right in front of you confirming you're indeed in ghost mode.
