Support Documents
Positive Control set out with the goal of designing the most realistic air traffic control simulation available. In keeping with that goal, we began by rethinking how our client software would interact with our server software. In the real-world, the processing power for these systems typically comes from a central mainframe computer located at each air traffic control facility. Radar workstations used by air traffic controllers consist of human controllable interfaces that allow users to send commands and receive responses from the mainframe computer system.
On legacy networks, the server-side software is fairly basic while the radar clients themselves do most of the processing. On POSCON, we have moved most of this processing power from the radar client to the server. This serves two key advantages:
- It allows us to more closely emulate the real-world air traffic control systems.
- It allows future developers to tap into robust APIs to quickly create new user-interfaces for different countries.
Initially, we have chosen to focus on developing ERAM or En Route Automation Modernization, which is the interface used to control enroute air traffic in the United States of America. Future development efforts will focus around the following:
- Terminal radar systems in the United States of America; and
- International radar systems.
The above is POSCON's tentative internal development roadmap, but it assumes that no other opportunities present themselves. We are more than happy to interview new developers that are interested in developing their own radar systems as well. Please email info@poscon.net if you are capable of assisting.
Generally, assume that any missing functionality is known to developers. Any functionality that is described in this manual, but is not working as intended should be reported via the Support Center. In the event of a crash-to-desktop or other bug, please create a support ticket. Make sure to be as thorough as possible in your report including detailed steps to reproduce the issue.
The Radar Client produces two log files which we will need to debug any reported issue. Please locate the these two files by navigating to AppData\Local\POSCON\Radar Client and attaching the following files to your ticket:
PositiveControlRadarClient_crash.dmp
PositiveControlRadarClient_crash_.txt
For minor support issues, please post in the POSCON Network Discord server > ATC > #coffee-pot channel.
Known Issues as of March 4th, 2021
Issue: If the Launcher Client is not running or your token failed to refresh, then you will see "NOT RECEIVING SURVEILLANCE DATA" and in the Messages View window, you will see the following error:
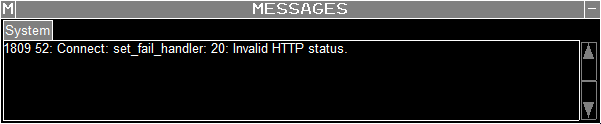
- Solution: Simply restart the launcher and try again.
Issue: When Signing-In to a position, you see the following exception in the Messages View:
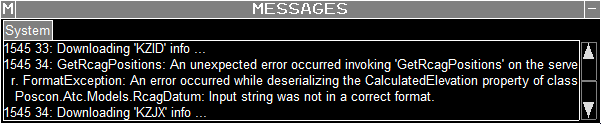
- Solution: This is normal. It means that no one has created any Facility Data for KZID, thus the server was unable to download anything.
Issue: You Sign-In to a position and your VSCS is blank.
- Solution: Consult with your FIR's Facility Data Specialist. There is likely something wrong with the facility data.
Please see our ATC Policies document for more information regarding ATC policies on the Positive Control Network.
-
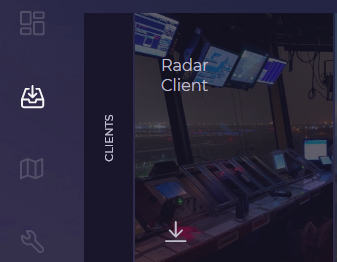
Users may download Radar Client through the POSCON Launcher Client. The option to download the Radar Client will become available when SSO ATC access is granted. If you do not see it after this authorization is granted, you may need to log out and back into the Launcher Client.
-
Once the Radar Client is downloaded, check changelog to ensure you have the current version.
The Radar Client utilizes a dynamic zoom feature that allows users to display different maps based on zoom level. Currently, a user needs to manually configure the sector file in order to get this feature to work correctly. The following steps will go over the manual manipulation required. Please note that this is a temporary solution until a more automated system is developed:
-
Open any sector file in the .SCT or .SCT2 format using Notepad++ or equivalent text editor.
-
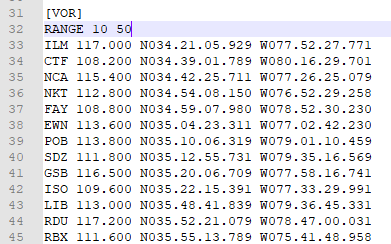
By default, when a sector file is loaded, all sector data is automatically rendered on the screen. This can be very cluttered, thus we have included the ability to specify RANGE values for specific elements. RANGE corresponds to your Radar Client zoom level.

In this example, your current RANGE is 845. -
It is good practice to turn all elements of a sector file to OFF by creating a RANGE value from 0 to 0 (e.g. RANGE <SPACE> 0 <SPACE> 0) for each element. This will give you a clean slate from which to work and allow you to turn elements on and off at your discretion.
-
When you are ready to start enabling specific elements, find where the element begins in the sector file and add the bottom and top of the range. In the example below, the user wants the [VOR] data to appear from range 10 to 50, thus they have entered RANGE 10 50.
-
Once a RANGE value is set, the Radar Client will continue to apply that value to every subsequent element found in the sector file without a RANGE value set. That is why it is good practice to include a RANGE value for each element in a sector file, even if it is RANGE 0 0.
NOTE: It may be required to add a RANGE value at the end of the sector file for the file to work at all.
The main limitation to this RANGE method is if you quickly want to change between airport configuration maps, then you will likely need to either edit the sector file to display the correct map or you can have multiple sector files with the RANGE values preset.
In order to launch the Radar Client, open the POSCON Launcher, navigate to "Library", and click the "Launch" button on the Radar Client panel.
There are a few things worth noting about the first time you launch the Radar Client:
- The Launcher Client keeps a token refreshed which prevents the user from having to type in a username and password, thus the Launcher Client must be running in the background at all times in order to authenticate and authorize your session.
-
When you open the Radar Client, you are automatically logged into the network as an observer. You should immediately see traffic, but you will not be able to manipulate datablocks. If your Radar Client is not receiving aircraft position data from the server, you will see the following on your screen:

You can manually log into or out of the network by invoking the following commands in the MCA or Message Composition Area:- Log-In = LI <KBE>
- Log-Out = LO <KBE>
-
The functionality to invoke Preference Settings (Pref Sets) does not currently exist yet, but all preferences are saved automatically in a text file called EramGuiState.txt which is located in the AppData\Local\POSCON\Radar Client\Session folder. Each time you move a window, increase the size of a font, drag a tearoff button to a different position on the screen, etc. the Radar Client automatically saves that change in the EramGuiState.txt file. We highly recommend you back up this file once you have configured the Situation Display the way you like.
NOTE: You must have a "clean" shutdown of the radar client in order for changes to be saved in the EramGuiState.txt file. - To load a sector file, type LOADSCT <KBE> in the Message Composition Area (MCA). This will open a file browser where you will need to locate the sector file you wish to use. By default, the browser is set to look for .SCT files, but this can be changed to search for .SCT2 files instead. When you locate the desired file, click "Open" and the sector data will load.
After launching the Radar Client for the first time, you must set your desired hardware. To do this, go to the Master Toolbar, then left-click on "VIEWS", and then left-click on "HW CONFIG". The following window will open:
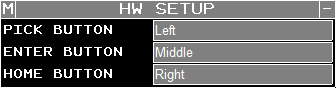
Make sure you are familiar with what the mouse buttons control:
- Trackball PICK, which is referred to as TBP in this document. TBP defaults to mouse left-click, but it can be changed via the drop-down menu.
- Trackball ENTER, which is referred to as TBE in this document. TBE defaults to mouse middle-click, but it can be changed via the drop-down menu.
- Trackball HOME, which is referred to as TBH in this document. TBH defaults to mouse right-click, but it can be changed via the drop-down menu.
In order for the voice communications system work properly, you must also configure your audio hardware in the Launcher Client.
For recommended audio settings, see this FAQ question.
Incoming server and alert messages can be viewed from the Master Toolbar > Messages
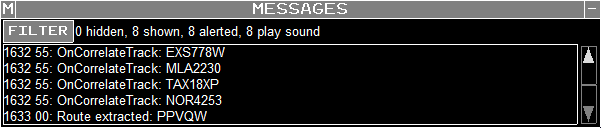
There are different filters that can be applied to incoming messages. You can access these filters by clicking the "FILTER" button in the top-left hand corner of the window. This will open the Message Filter View:
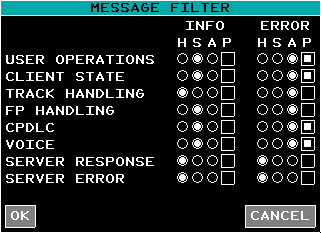
Info Messages - General information to the user
Error Messages - More severe messages, when something is wrong and needs the user's immediate attention.
H = Hide
S = Show
A = Alert (box)
P = Play (sound)
- User Operations - Messages that are related to any kind of user operations (e.g. target is not tracked by you, flight plan editing messages, not logged in when using SI command).
- Client State - Radar client state changes (e.g. logging in to the network, role changed, downloading info).
- Track Handling - Flight plan track related (e.g. handoff request, unghost approved, OnStartTrack, OnCorrelateTrack).
- FP Handling - Flight plan related (e.g. CancelFlightPlan, UpdateFlightPlan with route, OnFlightPlanActivate)
- CPDLC - Related to CPDLC (e.g. session terminated, CPDLC session start, all CPDLC messages).
- Voice - Related to voice (e.g. voice connection is ready, voice connection reset, voice disconnected).
- Server Response - Messages coming from server immediately after issuing any command. When the server detect that user operation is not valid.
- Server Error - When the general OnAsyncException is called from server side.