Support Documents
The Radar Position (R-Position) interface consists of the following components:
- Buttons - Typically used to open different windows and views
- Toolbar Button - Used to invoke different toolbars
- Situation Display - Used to view traffic and sector data
- Message Composition Area (MCA) View - Used to compose and execute commands, receive syntax feedback and short character server responses
- Response Area (RA) View - Used to receive long character server responses such as flight plan readouts
- Time View - Used to view the current UTC or Coordinated Universal Time (aka Zulu)
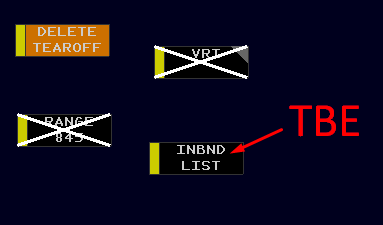
Buttons are used to open sub-menus, views, or toggle certain features within the Radar Client. A button can be activated or de-activated by TBP/TBE while the cursor is positioned within the button content area.
-
Menu Buttons
-
Blue indicates the sub-menu is closed.

-
Brown indicates the sub-menu is open.

-
Blue indicates the sub-menu is closed.
-
Toggle Buttons
-
Black indicates the view or feature is not currently displayed.

-
Gray indicates the view or feature is currently displayed.

-
Black indicates the view or feature is not currently displayed.
-
Override Function Button
-
Black indicates the override is currently deactivated.

-
Gray indicates the override is currently activated. The user must press and hold TBP/TBE on the button for the function to continually activate.

-
Black indicates the override is currently deactivated.
-
Increment/Decrement Buttons
-
Increments (TBE) or decrements (TBP) the indicated feature.

-
Increments (TBE) or decrements (TBP) the indicated feature.
-
Command Buttons
-
Teal indicates a command that is not activated.

-
Burnt Coral indicates an activated command.

-
Teal indicates a command that is not activated.
The yellow border to the left of the button is used to reposition a button if desired. To do this:
- Position the cursor over the yellow bar.
- TBP and an outline of the button appears.
- Drag the outline to any location on the Situation Display, including any snap-to-grid position on a toolbar.
- TBP again to drop the button.
Buttons can be "torn-off" the Master Toolbar for quick access to certain application functions - we call these eligible buttons "Tearoff Buttons". Tearoff Buttons allow the user to close the Master Toolbar and still have access to a particular button's functionality. To delete a Tearoff Button:
- TBP/TBE on the "DELETE TEAROFF" button.
- TBE on the button you wish to delete.
To delete multiple Tearoff Buttons simultaneously:
- TBP/TBE on the "DELETE TEAROFF" button.
- TBP on every Tearoff Button you wish to delete except the last.
- TBE on the last button you wish to delete in the sequence.
The Toolbar Button is used to invoke all the available toolbars in ERAM. It is a floating button that can be positioned anywhere on the screen. It cannot be covered up and it cannot be deleted.
The Situation Display is the area used to view traffic and sector data. The orientation of the Situation Display is always true north. The Situation Display has a dynamic projection feature which transforms the sector data as you move away from the equator.
- To pan around the Situation Display, hold right-click on your mouse and move your mouse to the desired location.
-
To zoom, use your mouse scroll-wheel (forward zooms in, aft zooms out).
NOTE: Users are prevented from using the scroll-wheel while the cursor is positioned over any portion of a target, position symbol, or datablock.-
Zooming can alternatively be accomplished by clicking TBP/TBE on the "RANGE" button on the Master Toolbar. Once open, a user can drag the range slider up or down to adjust the range using TBP. Additionally, TBP can be used to choose one of the preset values (black numbers). Positioning the cursor in the green region and then using TBP will decrease the range while TBE increases the range.

-
Zooming can alternatively be accomplished by clicking TBP/TBE on the "RANGE" button on the Master Toolbar. Once open, a user can drag the range slider up or down to adjust the range using TBP. Additionally, TBP can be used to choose one of the preset values (black numbers). Positioning the cursor in the green region and then using TBP will decrease the range while TBE increases the range.
- The brightness of the background can be controlled by clicking TBP/TBE on the "BRIGHT" button on the Master Toolbar. Locate the "BCKGRD" button and using the TBP button, you can incrementally decrease the value. Alternatively, by using the TBE button, you can incrementally increase the value. Holding down either the TBP/TBE button will rapidly decrease or increase the value respectively.
The MCA View is used to enter messages at the R-Position. As shown below, the MCA View contains two distinct areas: the Preview Area and the Feedback Area.
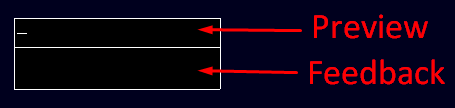
The Preview Area is the upper area of the MCA View and used for message composition. The Preview Area is initially displayed as two lines and can expand as more characters are entered. The left and right arrow keys can be used to scroll through the Preview Area and the ESC key can be used to clear the entered text. When a command is ready, press the keyboard ENTER key to execute the command.
The Feedback Area is the lower half of the MCA View and displays messages entered into the system from the Preview Area. The Feedback Area is initially displayed as 4 lines and can expand up to 34 lines if needed. The Feedback Area displays the following types of messages:
- Accept messages – preceded by a green check
- Reject messages – preceded by a red X
- Error messages – preceded by a red X
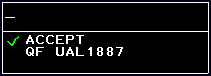
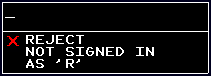
When an Accept or Reject message is returned to the Feedback Area, the Preview Area is cleared and will shrink back to two lines if it was previously expanded. The Preview Area expansion capability will be allowed again when the controller clears the Preview and Feedback Area by pressing the ESC key, a hard labeled function key, or by picking a category function key.
When the controller invokes the Recall function (up arrow key on keyboard), each entered command and up to 2 lines of associated feedback (accept, reject, or error) message is recalled and displayed.
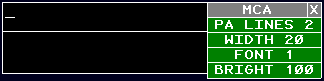
To access the MCA View Menu, TBE anywhere on the Preview or Feedback Areas (other than arrows and scroll bars). Functions available in the MCA View Menu:
- PA LINES - The number of lines displayed for the Preview Area.
- WIDTH - Provides the user with the option of controlling the width of the Preview Area.
- FONT - Adjusts the font size of the MCA View. There are 3 sizes available, TBP to decrease and TBE to increase the font size.
- BRIGHT - Used to change the brightness setting of the MCA View. The brightness range is 0–100 in increments of 2. TBP to decrease and TBE to increase the brightness setting.
To move the MCA View:
- TBP/TBE anywhere in view except scrollbars or arrows. A view outline appears.
- Trackball movement places outline in desired location.
- TBP/TBE to select the new location. The MCA view displays.
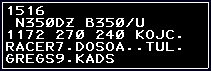
The RA View displays the response to a flight plan readout of an active flight as well as the readout of a DATIS query. The view can be moved to any location on the Situation Display (including areas covered by a Toolbar). The RA View has a default of 4 lines but will automatically expand to as many lines as needed. Only one message at a time is displayed in the RA View. New data replaces the currently displayed data.
Here is an example of when a flight plan is queried:
Here is an example of when a DATIS is queried. The example also includes the RA Menu open:
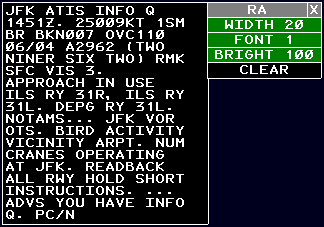
To access the RA View Menu, TBE when the cursor is within the boundary of the RA View when a pick area is not selected. Functions available in the MCA View Menu:
- WIDTH - Allows the user to set the width for the RA View (between a 25 or a 50 maximum character width)
- FONT - Adjusts the font size of the RA View. There are 3 sizes, TBP to decrease and TBE to increase the font size.
- BRIGHT - Used to change the brightness setting of the RA View. The brightness range is 0–100 in increments of 2. TBP to decrease and TBE to increase the brightness setting.
-
CLEAR - Used to the clear the contents of the RA View. TBP/TBE the CLEAR menu item. The RA View contents are cleared and the RA View contracts to
4 lines.
To move the RA View:
- TBP/TBE anywhere in view except scrollbars or arrows. A view outline appears.
- Trackball movement places outline in desired location.
- TBP/TBE to select the new location. RA view displays.
The Time View displays the current UTC time and can be customized and located anywhere on the display; but cannot be suppressed.
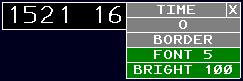
To customize the Time View:
- TBE the Time View to bring up the Time View Menu.
- TBP/TBE desired menu item as appropriate to change Time View settings.
To move the time view:
- TBP the Time View; a move frame (white view outline) will be displayed and the trackball cursor will be attached to the upper left hand corner of the frame.
- Move the frame to desired location on Situation Display.
- TBP/TBE to drop the frame and place the Time View.
Each View (i.e. window) in ERAM typically has an associated menu that can be invoked by TBEing when the cursor is within the boundary of the View OR by clicking the ![]() located in the top left corner of each View. You can see some examples of the View Menu from the sections above. The content in each View Menu usually varies, but some common options available include:
located in the top left corner of each View. You can see some examples of the View Menu from the sections above. The content in each View Menu usually varies, but some common options available include:
- O / T - This allows the user to choose between opacity or transparency.
- BORDER - This allows the user to choose between borders or borderless.
- FONT - This allows the user to choose between different font sizes.
- BRIGHT - This allows the user to adjust the brightness of the View.
To close a View, a user simply needs to TBE/TBP on the associated Toolbar button.
-
Associated View is CLOSED:
-
Associated View is OPEN:
Alternatively, a user can TBE/TBP on the ![]() and the View will close.
and the View will close.
R-Position Keyboard displays two sets of keys to enter computer messages: Category keys and Function keys. The following is an example of what the real-world ERAM system keyboard looks like:

The POSCON ERAM Radar Client has attempted to emulate some of these keys. The following special keys are currently implemented:
| ERAM Keyboard | Normal Keyboard |
| CLEAR | ESC |
| CRD | F2 |
| TRK | F3 |
| DROP TRK | F4 |
| ALT | F5 |
| SR | F6 |
| INT | F8 |
| CODE | F9 |
| HALO | F10 |
| RTE | F11 |
| SISO | F12 |
| ○ | SHIFT+1 |
| ? | SHIFT+3 |
| ? | SHIFT+4 |
| RECALL | UP & DOWN ARROWS |